Lesson .
.Robotic Arm Challenge
Overview
In this challenge, students will use a model robotic arm to move items from one location to another. They will engage in the engineering design process to design, build and operate the arm.
Materials
- 1 table (at least 80 cm long)
- Duct tape
- Masking tape
- Bowls
- Toy object(s) for grabbing
- Paper clips
- String
- Rubber bands
- Binder clips
- Dowels
- Barbecue skewers
- Chenille stems
- Brass fasteners
- Index cards
- Craft sticks
- Other choice craft supplies
- Stopwatch (optional)
Management

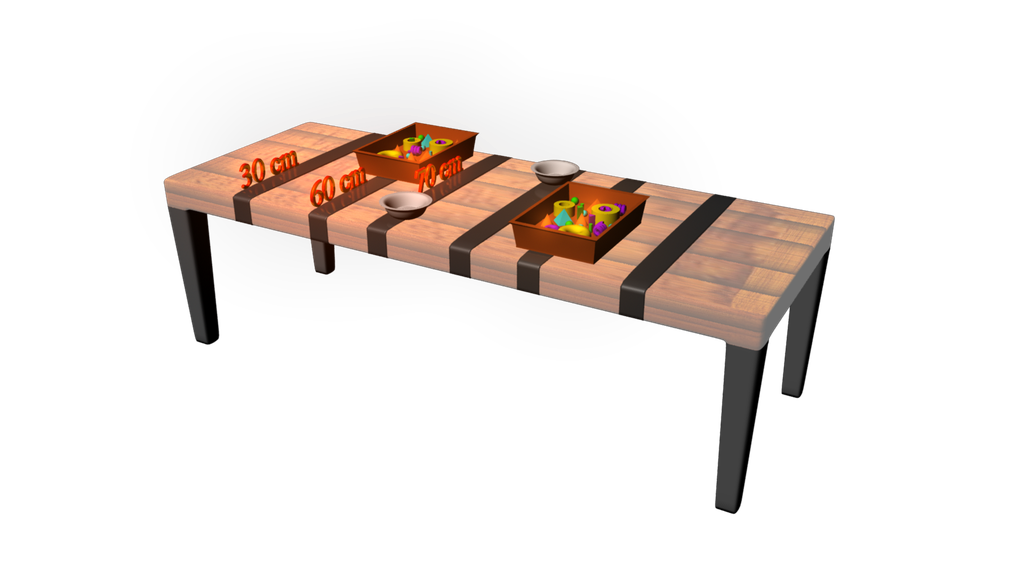
Graphic of a long table depicting two stations for the robotic arm challenge. The objective is to use a student-designed robotic arm to move as many objects as possible from the rectangular container (at the 60 cm line) to a container at the 70 cm line within a given amount of time without crossing the 30 cm line with any human body part.
Setup
- For best results, secure enough long rectangular tables to allow several identical stations to be set up.
- Place strips of tape across each table at 30 cm, 60 cm, and 70 cm from the edge, as indicated in the table graphic above.
- Place a container with objects of various sizes and shapes to be grabbed on the 60-cm line.
- Place an empty container on the 70 cm line.
- If your table is long enough, you may set up two stations as depicted in the table graphic above.
Background
NASA uses robotic arms to accomplish tasks that are potentially too dangerous, too difficult or simply impossible for astronauts to do. The robotic arm on the International Space Station can capture approaching cargo ships for docking or be used to assist astronauts on spacewalks. The Mars rovers Spirit, Opportunity and Curiosity were each designed with robotic arms that would help scientists on Earth conduct scientific experiments on Mars. While all of these arms look different, they are similar in that each robotic arm was designed to help it accomplish a given task.
On this episide of "Crazy Engineering," JPL engineers talk about how the robotic arm on NASA's InSight moves instruments from the lander onto the surface of Mars. Credit: NASA/JPL-Caltech | Watch on YouTube
Meet NASA/JPL engineer Ashitey Trebi-Ollennu, who builds robotic arms for Mars rovers and landers. Credit: NASA/JPL-Caltech | Watch on YouTube
Vocabulary:
- Rover - a space exploration vehicle designed to move across the surface of a planet or other celestial body
- Payload - the load, or object, carried by a vehicle
- Cargo Platform - the location on a rover designed to carry the payload
- End Effector - the gripping device that is located at the end of a robotic arm and has an effect (such as grasping) on objects within its reach
Procedures
- Introduce the challenge: Student teams must use their knowledge of simple machines and how they work to make a robotic arm that can perform the challenge tasks.
- Instruct students that they will be using the available materials to build a robotic arm capable of grabbing an object (representing a payload or rock sample) and putting it in a container(representing a cargo platform or rover instrument) without reaching across the 30 cm line with their own arm.
- Ask students to make a plan by sketching designs that might work to accomplish the task.
- Once teams have a viable plan, allow them to go forward with construction and testing.
- Consider giving students a limited amount of time (30 or 60 seconds) within which to move as many objects as possible using their robotic arm.
Discussion
Students should discuss among themselves in small groups, and be prepared to share with the class as a whole, some of the following questions:
- Which simple machines did you use to create your robotic arm?
- How easy is it to use and how effective is it?
- Are there improvements that can be made? If so, what can be improved?
Assessment
Effectiveness of the student design can be assessed by observing whether students are able to accomplish the objective of moving objects from one container to the other. Benchmarks of a certain number of objects moved in a set period of time -- say, 30 or 60 seconds -- may be set by the instructor. This activity may also be used in a competitive environment to see which team can transfer the most objects most efficiently in a set period of time.
Extensions
Challenge students to follow the links under "Explore More" to create more sophisticated end effectors for their robotic arms.
Explore More!
Lesson Last Updated: Sept. 25, 2025


